
racks
4 posters
Page 1 of 1

racks
![]() Zak Wed Feb 09, 2011 3:12 pm
Zak Wed Feb 09, 2011 3:12 pm
Anyone have any that they wanna sell or knows of anyone let me know.
Thanks.
Thanks.

Zak- Rank: Black Mamba

- Posts : 1195
Join date : 2010-11-21
Age : 46
Location : Mannford
Re: racks
![]() sbender99 Wed Feb 09, 2011 5:58 pm
sbender99 Wed Feb 09, 2011 5:58 pm
Jim Burns has pretty big rack holds 24 tubs for sale. There is also a 9 tub rack on sale on cl. http://oklahomacity.craigslist.org/pet/2203086090.html

sbender99- Rank: King Cobra

- Posts : 649
Join date : 2011-02-03
Age : 52 -

Zak- Rank: Black Mamba
- Posts : 1195
Join date : 2010-11-21
Age : 46
Location : Mannford
Re: racks
![]() Cameron Wed Feb 09, 2011 8:11 pm
Cameron Wed Feb 09, 2011 8:11 pm
i think you oughtta quit being a baby about it and build one! 

Cameron- Rank: Black Mamba
- Posts : 635
Join date : 2011-01-30
Age : 43
Location : OKLAHOMA -
Re: racks
![]() Zak Wed Feb 09, 2011 8:22 pm
Zak Wed Feb 09, 2011 8:22 pm
You know how me and building things go. I hate building stuff. If I were to build one what do you guys normaly use?
Zak- Rank: Black Mamba
- Posts : 1195
Join date : 2010-11-21
Age : 46
Location : Mannford
Re: racks
![]() Cameron Thu Feb 10, 2011 5:35 am
Cameron Thu Feb 10, 2011 5:35 am
i made mine out of plywood for less than $100 (totes included). it has lasted me 7 years so far....
Cameron- Rank: Black Mamba
- Posts : 635
Join date : 2011-01-30
Age : 43
Location : OKLAHOMA -
Re: racks
![]() sbender99 Thu Feb 10, 2011 5:49 am
sbender99 Thu Feb 10, 2011 5:49 am
Wow it's been awhile since you built a rack. You can spend 100$ on just the tubs now.
Plywood, screws not nails, and a good plan on the tubs you wanna use is a great start. Then there's a ton of ways to accomplish what you want after that. send me a pm and Ill give you my phone number and help you plan. You really need a good plan before starting to build, it can be so simple to really complex but you need to have a good plan.
Think about these things before building:
What are you housing and how big do they get? This determines tub sizes (one size for everything or multiple sizes for dif reptiles or ages) - Spend a lot of time thinking this one out! I like bigger tubs just because I like to give my snakes water bowls big enough for them to submerge in when shedding. this is much easier to do when the snakes are small but takes a lot of room when they get bigger. Others think that its ridiculous because a snake will supposedly shed just fine if it is properly hydrated. I think it has more to do with the humidity levels in the herp room than anything but I know I don't have bad sheds when the snakes have bowls big enough to get into regardless of humidity levels. Also think of the hide box you need and its dimensions.
Tops of tubs on or off? I think tops on retains moisture better but takes up more space. moisture can also be controlled by how many air holes you put in the tubs so you can accomplish this multiple ways. or put a humidifier in the room.
How many temp zones do you need to supply? just 90F for baby/juv balls? What about cycling? Will one row of your rack hold small snakes and another hold geckos and another hold big balls, etc? The answers will determine how many different heat zones you'll need to supply. Each heat zone takes its own heating elements and thermostats and possibly a timer. This can go from simple to very expensive depending on what you need to do and how big you want your power bill to be. If you go cheap in the build and make one heat zone for the entire 24 tub rack (one long piece of heat tape, one set of connections hooked to one thermo), you'll have to heat the entire rack even if you only have one tub in use to begin with. this can get expensive in the long run on power costs but is cheaper on building costs in the beginning. Also keep in mind that same issue applies to your emergency heating plan. If you lose power and have a 1200W generator working to heat several whole racks for one or two tubs each?
each foot of 3-4 inch heat tape is 6-10W depending on where you buy it.
each foot of 12 inch heat tape is 10W minimum.
each foot of heat rope is 20W.
heat tape length is pretty cheap and should be around $2.00/foot for 4" and heat rope is similarly priced. Don't recall price on 12" heat tape but the heat elements itself are pretty cheap in the overall scheme.
Now big difference between heat tape and heat rope:
heat tape you can buy by the foot and cut at whatever length you want. you have great flexibility here. The heat tape has two power rails running down each side of the tape that powers the heating elements laminated in the center of the tape. just cut it to whatever length you need and put some black electrical tape over the end where you cut it to prevent anyone accidentally touching the exposed power rails or heating elements exposed from the cut. On the other side of the heat tape, you take a power wire (they sell these at same place you buy the heat tape for 4-5$ each) that has a normal outlet plug on one end (that gets plugged into the thermostat) and on the other end has each of the wires split and a crimp on each end that you crimp with pliers onto each side of the heat tape so that the crimp goes through the heat tape laminate and makes a physical and electrical connection to each of the power rails of the heat tape. the vendor also usually sells cheap plastic protectors (4-5$ for a set) that are made to go over these crimped connections to the heat tape to protect someone from touching them and getting shocked and doing the "115V AC shuffle". Black electrical tape works too but just buy the connection protectors because they provide more protection for you and the connection itself if it gets wacked moving things around. You want it to last. Believe it or not this sounds difficult but its really pretty easy and cheap so far. I get my heat tape and parts from bigappleherp.com but you can get them various places for similar prices. just don't expect local pet shops to have them similarly priced.
Now the heat rope is a very different animal. heat rope can only be purchased at preset lengths and comes with a plug already attached and a terminator on the other end. There is no cutting or crimping required. For example, you get 26 feet of heat rope, you should have 26 feet of the heated wire section and then maybe 5 feet of non heated rope with a plug on one end. the heated part of the rope is usually marked in some way like bigapples' has blue lines on both ends of the wire. between the blue lines is the part of the rope that gets hot. the ropes are best used IMHO for incubators or non rack applications where you build a grid of your choosing or in unconventional places where the rope offers flexibility that the tape cant provide. I use mine to ring the bottom of my incubator twice on all three sides. The rope must be placed at least one inch apart when taped up somewhere to make your heat grid. There are just some places where the rope makes sense and then some that the heat tape makes sense. I can say, for my incubator, the rope was slightly cheaper and was more appropriate than if I used heat tape. =)
the electrical grade aluminum tape to hold down the heat tape or heat rope is pretty cheap -like 25cents a foot. still cheap so far.
then thermostats are 30-40$ a piece (Zilla/Alife/etc.) or if you want to get pricey, or if its for a incubator, HELIX proportional thermostats are at least 100 if not 125$ each. *One note if you want to add timing to a thermostat (night time temp drops, etc) Helix has this option (costs a lil more for the attachment) and some of the 70$+ thermostats also have this option (lllreptiles.com). The 30-40$ thermos don't.
the regular 30-40$ thermostats are an on/off operation for heat - all or nothing. heating elements are either all on or off. the thermostats throw 100% of power to the elements plugged in until they reach the thermostats temp you set. Then the thermostat turns the power to the elements completely off (no power). then the thermostat sensor notices the temp drops two to three degrees below its set temp and the thermostat throws full power back to the heating elements and turns them back on. Up and down within a few degrees.
HELIX is a proportional thermostat and meant to hold a constant temperature by varying the amount of electricity to your heating elements to maintain a constant temp within I believe 1 or less degree. so these work best for incubators or if you just are super serious about your reptiles and want to spend a lot of money on them =) good for you! I'm more on the broke side so 30-40$ thermos are fine for my racks.
Each of the 30-40$ thermostats has three plug-ins for heating elements that it will control. I'm not sure how many plug-ins a HELIX has for heating elements because I don't own one yet.
now how many thermostats you need depends on how many different heat zones you want to maintain (1 thermo per temp to maintain) or how many rows of heat tape you would like to break up your heating into to save power money when the rows aren't used (each 30-40$ thermo has three plug-ins standard).
One other serious consideration with thermostats is wattage of the heating elements it will control. (see watts above for each rack heating element) They sell 500W versions of the 30-40$ thermos for 25-35$. Just get the 1000W versions for 5 bucks more.
I'll add pics to illustrate these different concepts as soon as I can. Hope this helps.
Sometimes its easier and cheaper to buy a rack already made. However, you don't know what real thought they put into it. If you are gonna buy one - make sure everything works before buying it. It heats to the temp you need. Thermostat really works -not just the lights come on. Look for external parasites on it. Don't buy something out of someone's backyard shed unless you wanna get it home and ticks start crawling out of it. pull out each and every tub and make sure the plastic isnt brittle, old or broken. Make sure each tub slides in and out without catching. Is it filthy? etc.
One other thing I wanna mention, the rack may not have it when you buy it, but think of a young child coming into your herp room without you knowing and pulling out a tub. Think of some security to stop a major accident from happening. No one wants to lose a child. A simple nail that has to be pulled out to allow the tub to slide or something to give you peace of mind.
sbender99- Rank: King Cobra
- Posts : 649
Join date : 2011-02-03
Age : 52 -
Re: racks
![]() Zak Thu Feb 10, 2011 11:39 am
Zak Thu Feb 10, 2011 11:39 am
Lots of good info there and thanks scott. I sent ya a pm. Cameron I like your racks and I like the size of tubs you are using.
Zak- Rank: Black Mamba
- Posts : 1195
Join date : 2010-11-21
Age : 46
Location : Mannford
PatHigdon- Rank: Black Mamba
- Posts : 739
Join date : 2010-05-21
Location : Tuttle, OK
Re: racks
![]() Zak Thu Feb 10, 2011 1:50 pm
Zak Thu Feb 10, 2011 1:50 pm
I like those for sure. Thanks Pat. Looks like I'm gonna head to home depot this weekend.
Zak- Rank: Black Mamba
- Posts : 1195
Join date : 2010-11-21
Age : 46
Location : Mannford
Re: racks
![]() sbender99 Thu Feb 10, 2011 2:34 pm
sbender99 Thu Feb 10, 2011 2:34 pm
here's some pics of what i mean:

Example of single, well double end run of two 4 inch heat tapes going from top to bottom and with one connection each to a single thermostat. Youll find that some people leave the plastic tubs directly on top of the heat tape. Others, like this one put something in between to heat up and radiate the heat more evenly. This also does less wear and tear on the heat tape from sliding tubs in and out. Here they used a panel sheet and other places you'll see they use metal sheeting.

This is a 24 tubber that I got from Jim. It looks exactly like the one he has still available. it has4 inch tape and metal flashing to radiate the heat much like the Baileys does. Its a single run of heat tape throughout the whole thing with one plug and one thermostat.

This is one I build myself for geckos to begin with. It was made from an old entertainment system. So wood cost me nothing. However each shelf has its own connection to the thermostat and power. So any row not being used can be unplugged. I plan to use it for hatchlings.

those 4-5$ pieces add up and make this an expensive way to go but it is an option especially if you are going to have many different temps needed for different type snakes.

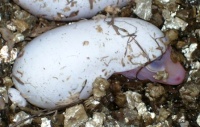
This is my incubator with double heating elements (three foot of 12" heat tape up top going to one thermostat and several meters of heat rope around the bottom going to another thermostat) and double thermostats. Each thermostats probe is places at a different spot in the incubator and they are both set to 89 degrees. Also have a temp and humidity gauge with probes that will go into the egg boxes to more accurately tune the thermostats.

Example of single, well double end run of two 4 inch heat tapes going from top to bottom and with one connection each to a single thermostat. Youll find that some people leave the plastic tubs directly on top of the heat tape. Others, like this one put something in between to heat up and radiate the heat more evenly. This also does less wear and tear on the heat tape from sliding tubs in and out. Here they used a panel sheet and other places you'll see they use metal sheeting.
This is a 24 tubber that I got from Jim. It looks exactly like the one he has still available. it has4 inch tape and metal flashing to radiate the heat much like the Baileys does. Its a single run of heat tape throughout the whole thing with one plug and one thermostat.
This is one I build myself for geckos to begin with. It was made from an old entertainment system. So wood cost me nothing. However each shelf has its own connection to the thermostat and power. So any row not being used can be unplugged. I plan to use it for hatchlings.
those 4-5$ pieces add up and make this an expensive way to go but it is an option especially if you are going to have many different temps needed for different type snakes.
This is my incubator with double heating elements (three foot of 12" heat tape up top going to one thermostat and several meters of heat rope around the bottom going to another thermostat) and double thermostats. Each thermostats probe is places at a different spot in the incubator and they are both set to 89 degrees. Also have a temp and humidity gauge with probes that will go into the egg boxes to more accurately tune the thermostats.
sbender99- Rank: King Cobra
- Posts : 649
Join date : 2011-02-03
Age : 52 -
PatHigdon- Rank: Black Mamba
- Posts : 739
Join date : 2010-05-21
Location : Tuttle, OK
Re: racks
![]() Zak Thu Feb 10, 2011 8:37 pm
Zak Thu Feb 10, 2011 8:37 pm
Scott that does look good. It was good talking to ya today thanks a lot for helping me out. What are u using to seperate the heat from the tubs?
Zak- Rank: Black Mamba
- Posts : 1195
Join date : 2010-11-21
Age : 46
Location : Mannford
Re: racks
![]() PatHigdon Fri Feb 11, 2011 8:11 am
PatHigdon Fri Feb 11, 2011 8:11 am
The first rack I did, I made the mistake of not covering the heat tape, and just from the tubs rubbing over the tape caused alot of bare spots and burning of the bottoms of the tubs.
PatHigdon- Rank: Black Mamba
- Posts : 739
Join date : 2010-05-21
Location : Tuttle, OK
Re: racks
![]() sbender99 Fri Feb 11, 2011 9:17 am
sbender99 Fri Feb 11, 2011 9:17 am
Ive only seen two things used so far - I'm still a noob lol. I've seen that cheap panel board used you can see in the pic with the probe on one of the racks I have(it works) or thin metal flashing(it works too). You really should consider the rack that Jim has for sale based on the number of animals you told me. It has room for growth and it was really made right and uses flashing. You can learn a lot from it. It looks just like the one I have in the pics and its about the price you can make one for yourself. If you text me I'll give you his number if he says it's ok. I'm sure he will. He's right next to Tulsa so I think right next to you. Now the only question I have that I don't know due to my ignorance of retic care is you said you wanted to house both baby/juvi retics and balls. I believe his tub size is 28qt (fine for balls) but I don't know if that will work for retics. Also the temp the retics require may be different than balls, if so you may need two different heat zones. The balls take a underbelly heat of 90 degrees on one side and 80 on the other side of the tub. However, if they do take two different temps you could easily hang a second thermo and cut the heat tape midway, terminate it with electrical tape and then crimp a new connection to the rest of the heat tape that's left to create two heat zones. Its easy and pretty cheap. Id help in person if you weren't so far away. Ugghhh
Hope this helps and I loved talking with ya about ball pythons and morphs. It was very nice to find someone to talk to that had some of the same projects and concerns I do. My apologies to your wife for talking so long.
For everyone = Like I told Zak, I have a spreadsheet I made of all current recessive, dominant and co-dom (including supers) genes/traits for ball pythons as ingredients across the top and then listed projects I would like to make down the left hand side. Then I marked what ingredients were necessary for each project I was interested in across the spreadsheet row. Then, at the bottom, I tallied each ingredient to show how many of those projects required that gene. I did this so I could get an idea of what snakes I needed most when money became available. No surprise, I needed pastel spiders out the wazoo for the projects I chose. lol But it really did help me visualize where I should concentrate and what was really not that important. One thing I did decide when making the spreadsheet was if the super of a "morph/gene" was not proven yet, I did not add the morph to the list of ingredients across the top. So you may think some morphs are missing and they just may be but if I couldn't find proof of the super I didn't add it. Just too many people out there trying to pass off new "morphs" without proving them out first. *Anyone is more than welcome to a copy of the spreadsheet if you send me a PM with your email address and a banana morph ball python. I'd prefer a male! Just kidding!! I'll send it to you for nothing and you can delete my projects and put your own in there and do what you will with it. I only ask that if you improve upon it significantly that you offer me a copy in return.
Hope this helps and I loved talking with ya about ball pythons and morphs. It was very nice to find someone to talk to that had some of the same projects and concerns I do. My apologies to your wife for talking so long.
For everyone = Like I told Zak, I have a spreadsheet I made of all current recessive, dominant and co-dom (including supers) genes/traits for ball pythons as ingredients across the top and then listed projects I would like to make down the left hand side. Then I marked what ingredients were necessary for each project I was interested in across the spreadsheet row. Then, at the bottom, I tallied each ingredient to show how many of those projects required that gene. I did this so I could get an idea of what snakes I needed most when money became available. No surprise, I needed pastel spiders out the wazoo for the projects I chose. lol But it really did help me visualize where I should concentrate and what was really not that important. One thing I did decide when making the spreadsheet was if the super of a "morph/gene" was not proven yet, I did not add the morph to the list of ingredients across the top. So you may think some morphs are missing and they just may be but if I couldn't find proof of the super I didn't add it. Just too many people out there trying to pass off new "morphs" without proving them out first. *Anyone is more than welcome to a copy of the spreadsheet if you send me a PM with your email address and a banana morph ball python. I'd prefer a male!
Just kidding!! I'll send it to you for nothing and you can delete my projects and put your own in there and do what you will with it. I only ask that if you improve upon it significantly that you offer me a copy in return.
sbender99- Rank: King Cobra
- Posts : 649
Join date : 2011-02-03
Age : 52 -
Rat Racks for Zac
![]() sbender99 Fri Feb 11, 2011 12:54 pm
sbender99 Fri Feb 11, 2011 12:54 pm
Zac asked about making Rat Racks so I'm posting some more pics. Its very easy. Just start with 2x2s or get 2x4s and cut em longways if you have a table saw. My wife went to the hardware store when they were having a sale on 2x2s and I didn't have a table saw anyway. Save money anyway you can. The tubs are cement mixing tubs and you can get em at any hardware store. Rats and mice cant find anything to get hold of to gnaw on and they work great. These racks aren't rocket science at all. Just get the correct screws that are as thin as possible because 8s are too big and split the wood. Use a staple gun to mount the mesh to the boards above the tubs- mesh facing down to the tubs. Use the proper sized mesh- available at any hardware store. You'll see the third rat rack I got I bought from someone and it was made all wrong and I had to tear it apart and put it back together right however, it still has the small mesh which I would discourage you from using. If you use the bigger mesh you can place the rat blocks on top and the rats or mice will wacky wall climb and get it no problem. Smaller mesh they cant do that. You basically start at the bottom and build up with a box base and four full sticks in the air. Go up far enough for the tub to sit level and pull out without hitting the base and place two boards across from front to back for the tub to sit on. Then put the tub there for place holder. Then place your first top which is made to the size of the tub with the mesh stapled to the bottom. Leave an extra 1/8 inch of free play here or your tubs will stick and be a B*&^% to pull in and out. Then do the same thing again but remember that if you are gonna use water bottles like I do you need to leave room for the water bottle to lay there without interfering with the next tub. We left too much room as you can see. If you use gravity fed auto watering you drill out a small hole in the tub and run a water line using gravity water feed into a dispenser piece that goes into the tub. Contact Chris McVicker if you wanna do gravity fed auto watering as hes an expert at setting this up. It also allows you to get more tubs much closer together without having to leave room for water bottles. Anyway just keep doing the same thing over and over and build up and up as far as you wanna go. I don't go over four feet in height just because I don't wanna be getting out a step stool to see whats going on in there. Id also recommend for everything in your herp room, -racks, everything, get the floor sliders for moving furniture easily and put them on the bottom of everything. They are cheap at wallyworld or the dollar store. Here's the pics and hope it helps.


sbender99- Rank: King Cobra
- Posts : 649
Join date : 2011-02-03
Age : 52 -
» New Racks!!!!!
» My Rat Breeding Racks
» Wanted: Rat Racks
» Reptile Basics Hatchling Racks for sale
» Several snakes, rats, and rat racks for sale, please read for list...
» My Rat Breeding Racks
» Wanted: Rat Racks
» Reptile Basics Hatchling Racks for sale
» Several snakes, rats, and rat racks for sale, please read for list...
Page 1 of 1
Permissions in this forum:
You cannot reply to topics in this forum|
|
|